24/12/10
An interview with Collin Antos, part 2: Bringing an old sewing machine back to life

If my Part 1 talk with Collin Antos sounds like a commercial for the Singer 15-91, that's because originally that was the goal: When I first came across Antos and read about his extensive refurbishment process for these sewing machines, I thought "Man, we gotta ask him to sell these through Hand-Eye Supply!"

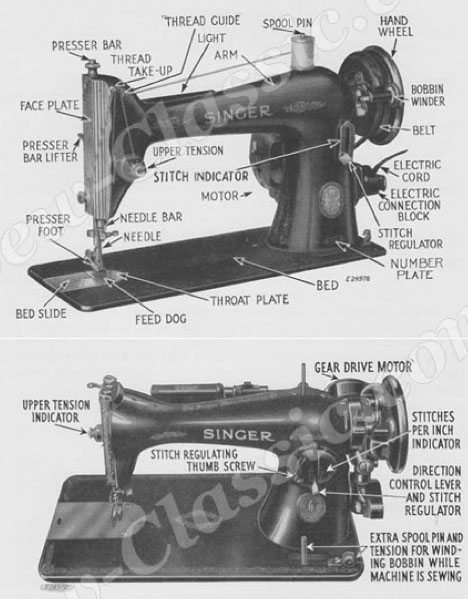
I figured our readers who'd want a machine like this would want to avoid the frustrating eBay bidding process, where victory is often snatched away at the last minute. It's even more painful losing a bid on an Antos machine, as I have, because they're so individual--he does extensive write-ups on the specific process for each machine, gives the machine's serial number (which you can then look up on Singer's website to see where and when it was made), and even shoots an individual YouTube video showing the specific machine sewing through a variety of materials. You can see the one he made for the machine I eventually bought from him down at the bottom of this entry, and my machine itself is pictured here going under the knife.

(Despite our wooing efforts, Antos is skittish about turning a hobby into a business. Unless we can get the guy to change his mind, if you want to buy one of his machines you'll have to go through the bidding process on his eBay wares.)
Now for Part 2 of our interview, where Antos gives us the breakdown on breaking these machines down, then building them back up. It's a heckuva lot more involved than cleaning out half-a-century-old gunk and replacing World-War-II-era wiring.

The guy makes his own springs, for chrissakes.
There are two springs in the bobbin winding assembly that, if broken, no replacements exist for. So I actually bought 12-inch spring stock of the same wire diameters and opening diameters and I form replacement springs myself.
I remove and resolder in, new, all of the wires from the motor, the foot controller and the light. Then I crimp and solder on electrical O-Ring-style wire terminators so that if something goes wrong on the machine in the future it can be serviced easily...
...I disassemble the light and rebuild and scour the switch--that means I actually disassemble the switch itself and remove every part it--so the entire thing is like brand new.
I take the foot controller apart and clean all of the contacts. If the controller has springs for a rheostat then I replace those as well.
I completely take apart the bobbin section and steel wool and alcohol every piece.
The thread tensioner gets completely disassembled and scrubbed with steel wool and alcohol and then reassembled. Even though this is an easy part to disassemble and clean it's the hardest part to reassemble correctly.
The light is actually the most difficult part, its very time-consuming and probably takes me 1.5 hours alone.
I should also mention that I even steel wool and alcohol clean every screw that I remove.
The direction lever and the plates behind it get removed. Then I put Singer-brand machine lube around the outside edge of the inner direction plate so when you set your reverse up, it slides super-smooth.
On the face of the machine I remove the cover plate and clean all of the moving parts. Cleaning the tensioner, the bobbin case, and under the front cover plate are very important because if there is any oil or dirt or grime in these areas it will discolor the thread as you sew.
I readjust the bobbin winder and put on a new rubber bobbin tire.
On the back of the machine I take the handwheel off and remove the motor completely. Then I clean out each tooth on the gears individually to remove the old congealed grease. I clean out the gear chamber and the lube tubes. This is a foul job because the old grease is just gross and messy. I put new Singer brand machine lube and reassemble the handwheel and motor. Then I oil the machine using Singer brand oil.
The instruction manual shows every spot that needs oiling so anyone can do it themselves, which is very convenient. Also the oil and the lube can be found at any chain fabric store and cost about $3 each and would be a lifetime supply for 1 machine.
The last thing that I do is use turtle wax on the black surfaces. This gives a great shine....but the secret is after the turtle wax has been removed (just like you do on your car) put about 5 drops of the Singer oil right on the bed and then 5 more drops right on the top of the machine. Then use an old soft knit cloth and rub the oil into every black surface. If you want a show-room-shine that's the way to get it! Don't be afraid to do it because 99% of the oil comes off on the cloth and the results are amazing.
* * *
Below is the original video Antos sent me in advance of me buying this machine. It is long and practically unedited, as Antos wants to assure the buyer he is not intercutting footage of a different machine, but scanning through it should give you the idea.
So, the big question is, how can you buy one of his machines? He operates at eBay under the screenname "mossheart." At press time he had no machines available so there's nothing to link to.
Want to beg him, as we did, to sell these on Hand-Eye Supply? Leave a note for him in the comments!
Core77
No Response to "An interview with Collin Antos, part 2: Bringing an old sewing machine back to life"
Leave A Reply